
Do practices get stopped due to bad weather or just a little rain? Have you ever thought about how you can overcome such a situation? Knowing how to build a portable pitcher mound is the only solution.
A pitcher mound is a vital piece of equipment needed very often. One notable thing is its portability. Once you have a portable pitcher machine, no one can stop you from practicing; even the weather itself can’t.
Before stepping towards the building procedure, let’s clarify what it is. It’s a handy piece of equipment that gets used for practicing. You can easily take it out to the nearest playground, or you might place it in your home with a comfortable area.
Many locations and places are available where a pitcher mound is rare; hence, a handmade portable pitcher mound is the only solution.
Let’s see what materials and tools you need while building the mound. Our article will provide you the steps on how to build a portable pitcher ground fast and easily.
Table of Contents
What tools are required to build a portable pitcher mound?
- Plywood
- Sandpaper
- Hammer
- Staple
- Table Saw
- A screwdriver
- Hand gloves
- Safely glass,
- Lumber board (necessary)
- Planks
- Glue or taper
- Measuring tape
These twelve tools you must have near you. Without having these, pitcher mounds can’t be built. So prepare yourself and get them before following the instructions.
Instructions on how to build a portable pitcher mound
Once you have gathered all the tools and materials, you can start to build a portable pitcher mount. The whole thing is divided into three parts for your benefit. So let’s start:
Front part of the mound:
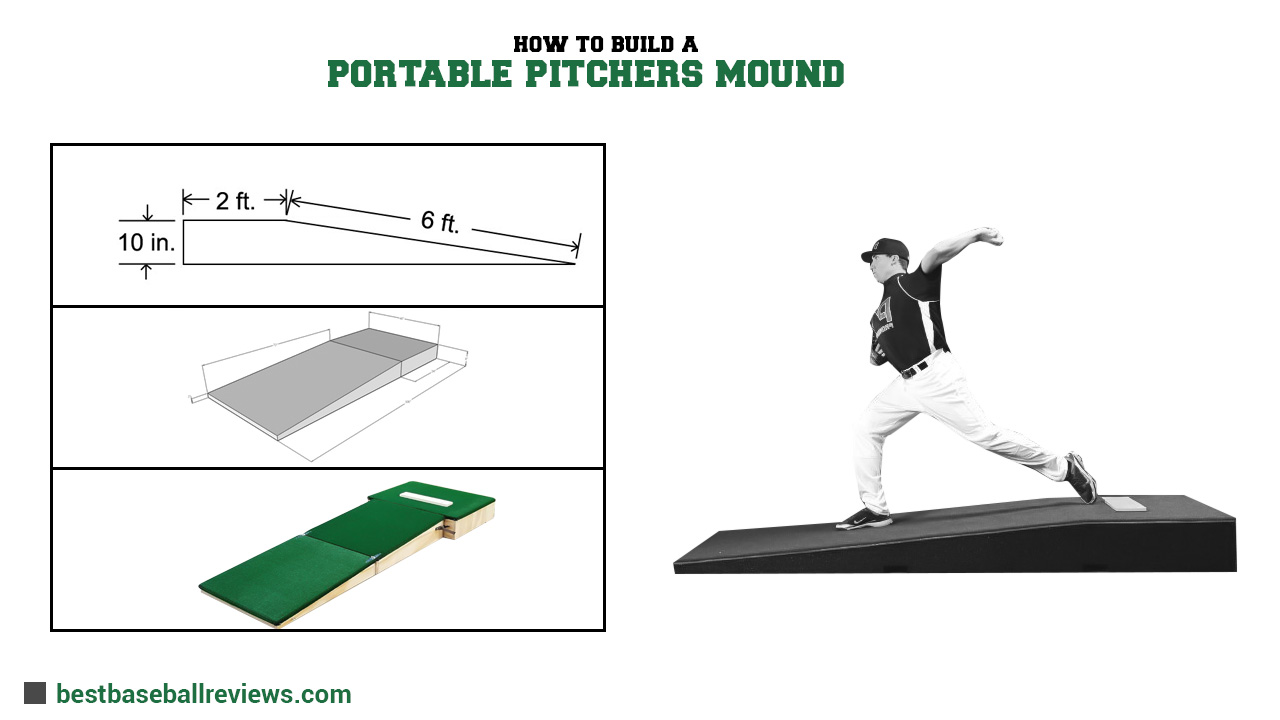
- Foremost, take the plywood in your hand, the length should be within 47-50 inches, and the width will be 6-8 inches.
- Take another board and cut it into the same pieces, only with a width of 2-3 inches.
Center:
- Now, get four boards with 6 inches width and 8ft length. Place the boards on your left side, right side, and in front of you.
- Starting from the left side, mark a point of 24 inches and sketch a line straight from the mark point to the right.
- Take the table saw in your hand and piece the plywood straight to the line. It’s a mandatory step to have an ideal slope angle.
By step 5, you should have something that resembles a portable pitcher mound. Just to be sure, let’s check shall well.
- You should have a 6-8 inches high rear plywood,
- 2-3 inches lengthy front end wood,
- 24 inches measure point,
- Lastly, a 2 inches height end and 72 inches long endpiece.
Builders need to repeat the same process three times more; it will provide direct support to the mound.
Slope and stand:
- Take another new plyboard. Cut it in a way so that the length would be 24 inches and the width would be 48 inches. Use one of them as a downslope and another as a standing base.
Steps on how to build a portable pitcher mound
- Each board’s front and back parts should be placed in a horizontal direction. Screw the center of them to have support.
- Examine the base structure’s top part and screw the slope and standing plate.
- To make a portable mound, we must include two casting wheels to touch the ground quickly. Not only the wheels but we also suggest adding a handle to transport it easily.
- You should split the turf with approximately 48 inches width and 8ft length.
- Now use the glue on the pitcher mound’s surface and attach the turf slowly with carefully.
- Find every joint or screwed part, and paint liquid nails.
- The bottom should be layered with a thin rubber; it will tig the floor.
We have instructed you to build an average size pitcher mound. If you need a bigger or smaller pitcher mound than mentioned here, you can do it by thinking a little. Every step will be the same; only the size will be different.
Frequently Asked Questions(FAQs)
How wide should a portable pitcher mound be?
The size is depended on the player and their requirement. However, any ordinary mound should be at least 48 inches.
What is the best size for a mound for my 11 year old kid?
Suppose the player is below 11; the mound height should be 6 inches. If the player is up to 12, they should use the 8inches tall mound.
Conclusion
There is nothing more critical playing equipment to a player belonging to a backdated area than a portable pitcher mound. You can even build a lightweight mound using high-quality plywood. We hope the instructions and steps on how to build a portable pitcher mound are helpful.
Having build a good pitcher mound you can also learn to build a wooden baseball bat with us.

