
Before we start this “how to draw a baseball cap” instructional article, let us learn a bit more about this baseball accessory. The primary purpose of the baseball cap was to shield the eyes of players from the sun. The first to have worn this style of the hat was the Brooklyn Excelsiors back in 1860. By the 1900s, this cap style became quite popular and part of every team’s uniform in every league.
In fact, fans could better tell them apart by wearing the cap, so teams also added logos in team cap design; thus, the cap served an additional purpose.
Here is a fun fact the baseball cap isn’t always called a cap. In fact, there is a whole list of baseball cap related lingo. For example, the button on top of the cap is known as a “squatchee” cap with flexible fits are known as “snapbacks”.
Well, now you know more about the subject of this how-to article, baseball cap. To draw a simple baseball cap, all you need are pencils, pens or markers and a sheet of A4 white paper.
Table of Contents
Step by Step Instructions on Drawing a Baseball Cap
Time needed: 4 minutes
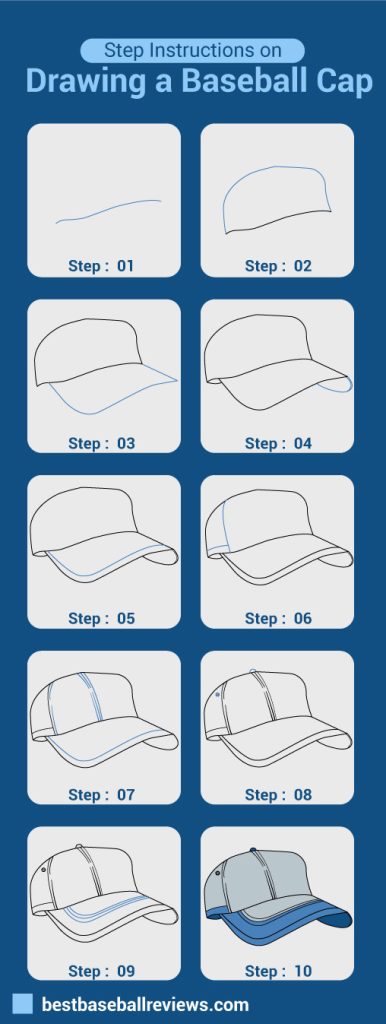
Here are the 10 steps to drawing a baseball cap. Following these steps will help you in drawing a simple but unique baseball cap in a short amount of time.
- Step 1: Curved Line
Starting any drawing is hard until you take the first step. To draw a simple baseball cap, the first step or line is both easy and vital since that line form the basis of the baseball cap.
The first step of a cap is a curved line from which the bill will be attached. Also, the length of the curved line will determine the size of the hat as well. Keep in mind that the curved line will not have one single curve but two. In fact, the curved line is more of a wavy line. - Step 2: Single Curved Line
The second step of the drawing process also involves a curve as well. However, this time, it will be a single curved line attached at the two ends of the first curved/wavy line you drew.
This irregular curved shape that you drew is the crow or the top of the hat, as we call it. - Step 3: Shield of the Cap
Now we will make the shield of the cap, and it will be another curve. Are you all seeing a pattern here, or is it just me?
This one single long curved line will go from one end of the crown to the other end. The curved line will create a rectangular shape that will attach to the crown. In general, the form we drew is called the bill of the cap. I told you there were lingos for baseball caps. - Step 4: Three-Dimensional Baseball Hat Drawing
On one end of the cap’s bill, there will be a shape that will add some depth and make the drawing slightly three-dimensional.
You will draw a curved line to make a teardrop shape underneath the cap’s bill on one side. Add some more detail to the teardrop shape with a parallel curve line. Be sure to attach the teardrop shape to the cap’s crow with a short curved(again) line. This new shape is to be the front edge of our baseball cap. - Step 5: Stitchings in Baseball Hat Drawing
On top of the cap’s bill at the edge, you will make a parallel curved line. This line will represent the stitchings on a baseball cap.
- Step 6: Sketched Line
In this step will be adding some sketched line that will show various panels on a baseball cap.
Firstly draw a curved line that goes from the top of the cap to the bottom of the crown. Next, you will draw another curved line that starts from the cap’s back to the line you drew previously. - Step 7: Panels are on Both Sides of Hat.
Do what we just did in step six but on the opposite side of the cap; this is simply because the cap’s panels are on both sides of the hat.
Also on this step will be showing the stitching for the panels. You will draw the seams for the cap using non-solid lines parallel to the panels and one down in the middle of the crown.
Make sure all the lines you drew are curved. - Step 8: Crown in Baseball Cap Drawing
For this step, two more broken lines on both sides of the line you drew in the middle of the crown.
Next comes the button that sits on top of the crown, which you will draw using one single curved line.
On either side of the cap, draw two circles; wow, we drew something other than a curved line, one side the other. The circles show eyelets that help with ventilation on hot summer days. - Step 9: Add Details in Cap Drawing
Let’s add some more details to your cap in the form of three rough “L” shaped lines on the cap bill.
- Step 10: Coloring Process of Cap Drawing
All that remains is the coloring process. For this, either pick the colors of your favorite team from the internet or make your own.
Bonus Baseball Bill Cap drawing
As I mentioned before, many teams attached their team’s logo to the cap’s design to help differentiate them from another group. You can add those logos to your design as well if you want.
Simply download and print the team’s logo and trace the shape on the front of the cap’s crown. Or better yet, make a logo of your own.
How easy is it draw a baseball cap for beginners?
Simple objects like tents and baseball bats or caps are the best things for a beginner to start drawing. These objects have simple shapes, and you can break them down into steps easily.
So if you are just starting to draw, then follow our guide to start drawing some great baseball caps.
Related Posts
How to Dry a Wet Baseball Glove: Step by Step Instruction in 2021

